Know your Raspberry Pi
In this article we would discuss the anatomy of Raspberry Pi. Below is picture of Raspberry Pi 2 Model B.
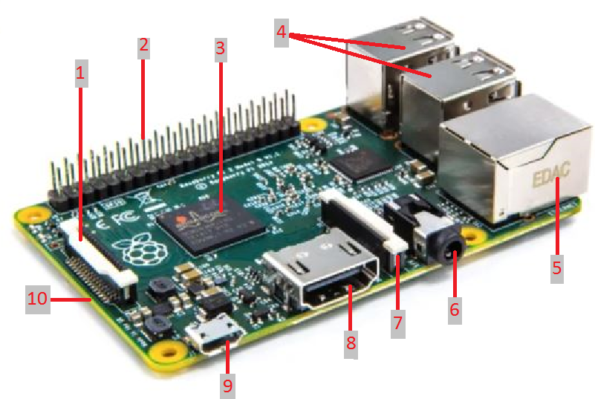
Anatomy of Raspberry Pi
1. DSI : The Display Interface (DSI) – is used to connect the display directly to the Raspberry Pi board.
2. GPIO Pins: These are 40 GPIO (General Purpose Input Output) pins, these pins can be directly accessed on the Raspberry Pi. These are used in projects to connect the Raspberry Pi to electronic circuits, sensors and control them. These pins can be turned on or off based on the requirement when the Raspberry is running.
3. ARM Processor: It’s the heart of the Raspberry Pi, the Broadcom BCM2835 900MHz quad-core ARM Cortex-A7 CPU with 1GB RAM.
4. USB Ports: The USB (Universal Serial Bus) ports are used to connect the standard accessories such as keyboard, mouse, Wi-Fi adapter etc. It has 4 USB ports. (It is recommended to use a powered USB hub to power all the USB devices like keyboard and mouse etc. because powering (connecting) these devices directly to the Raspberry Pi would leave the Pi underpowered, leading to shorter component life and even non functioning Pi.)
5. Ethernet Connection: you can connect the Pi to a network or home modem / router using an ethernet cable and this connection. The Raspberry Pi 2 Model B does not have a built in WiFi, but you can add an USB Wi-Fi adapter to the USB port.
6. 3.5 MM Audio / Video Jack: This 3.5 mm audio jack is normally used to attach headphones or speakers. On the Raspberry Pi2 it also carries composite video using a compatible cable.
7. CSI ( Camera Serial Interface): This interface is used to attach the Raspberry P1 Camera module directly to the motherboard via a CSI connection.
8. HDMI: The HDMI connection enables you to hook up the Raspberry Pi to the most modern Monitors and digital Televisions. It carries both the video and audio. ( Note: in case you have old monitors having VGA port – you would need a HDMI to VGA port adapter to hook up your Raspberry Pi to the old monitor)
9. USB Power: This port is used to power on the Pi. A standard Micro USB power supply to on the Raspberry Pi. You can also use a 5V 2000mA Micro USB power supply and compatible cable to power up the Pi.
10. Mini SD Card Slot: The Raspberry Pi does not have Secondary storage, you need to use min SD cards to store data and OS. These SD cards with OS need be inserted into the SD card slot before powering up the Pi.
Hope this helps. Please leave your comments and feedback..
Happy Maker 🙂